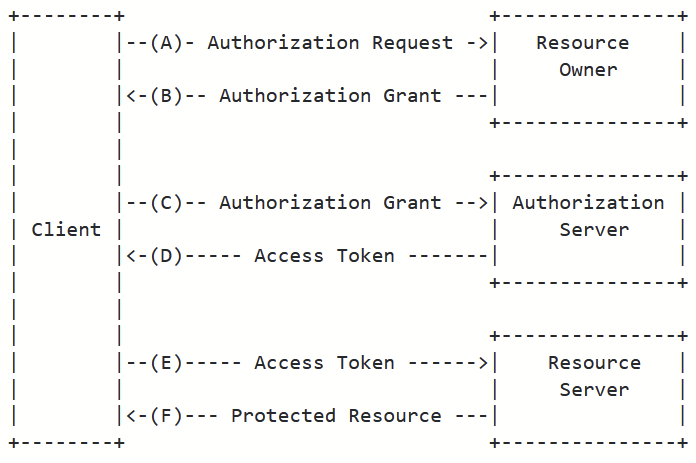
The OAuth2 spec cleanly separates the role of Authorization Server (AS) from that of Resource Server (RS). The role of the AS, and the whole OAUTH2 dance, is to get an access token that will be accepted by a RS.
It’s puzzling. It should be easy, nay, trivial, to implement the Resource Server side in Django, yet it’s not. There are several libraries whose description can be interpreted as “implementing OAuth2”, yet what they all do is implement the Authorization Server side. I want to consume access tokens, not issue them!
Now, in theory the access token could be anything. But common Authorization Server implementations (keycloak, authentik, various hosted services) have converged on issuing signed JSON Web Tokens. So what the resource server needs is to be configured with the key to verify the tokens. We could conceivably hard code the key in source or configuration, but that is a bit of a hassle, and anyway, this is the third decade of the third millennium, quite frankly we shouldn’t have to. All server implementations offer a JWKS endpoint where the currently valid keys can be queried (and even a full autodiscovery endpoint, to discover the JWKS endpoint). An implementation of a resource server should, in theory, only need to be pointed at the JWKS endpoint and everything should just work.
We want to authorize requests. Every time a new request comes in. That’s what a Resource Server does. It uses the provided token to check authorization. And apparently the documentation seems to suggest the correct way to do this is to fetch the keys from the JWKS endpoint on every request.
WTF?
We’ll need some caching. The documentation is mum on the topic. The implementation however is not. Turns out, they have implemented a cache. Only, they have implemented it on the PyJWKClient object itself. And there’s no easy way to hook up a real cache (such as Django’s).
The usual flow for normal Python web frameworks is that no object survives from request to request. Each request gets a clean slate. They may run in the same process sequentially. In different threads in the same process. In multiple processes. Or even async in the same thread in the same process. With the given example code we would be hitting the authorization server JWKS endpoint for every incoming request, adding huge latencies to processing.
In order to retain even a shred of sanity, we have no choice but to turn the JWKClient into a kind of singleton. It looks like this:
import jwt
from django.conf import settings


_jwks_client: Optional[jwt.PyJWKClient] = None


def get_jwks_client() -> jwt.PyJWKClient:
    # PyJWKClient caches responses from the JWKS endpoint *inside* the PyJWKClient object
    global _jwks_client
    if _jwks_client:
        return _jwks_client
    _jwks_client = jwt.PyJWKClient(settings.JWKS_URI)
    return _jwks_client
With this definition in place you can get the signing key as signing_key = get_jwks_client().get_signing_key_from_jwt(token) and will at least get some caching within a process, until the server decides to spawn a new process.
Then, to hook up authentication into Django Rest Framework you’ll do something like this (where User.from_token needs to be something that can turn a verified JWT dict into a User object):
def authenticate_request(request):
    if header := get_authorization_header(request):
        match header.split():
            case b"Bearer", token_bytes:
                token = token_bytes.decode("us-ascii", errors="strict")
                signing_key = get_jwks_client().get_signing_key_from_jwt(token)
                data = jwt.decode(token, signing_key.key, algorithms=["RS256"])

                if data:
                    return User.from_token(data), data
One of the lesser known features of modern SQL are so-called “Common Table Expressions” (CTE) or “WITH queries”. I’ll explain the mental model that helped me make sense of them, and how to use them to execute recursive queries. Afterwards I’ll show how to apply these techniques in Django.
Syntactically a CTE consists of one or more statements marked with WITH and placed before the statement they relate to, within the same SQL query. Conceptually these additional statements behave as if defining a view, or temporary table(s), that is valid only within this one SQL query.
The intended use is for simplifying complex or repeated operations and pulling them out of the main query. Let’s say you have normalized your database beyond all reason and have the following schema for storing names1:
CREATE TABLE name (
    id bigint NOT NULL,
    name character varying(50) NOT NULL,
    CONSTRAINT name_pkey PRIMARY KEY (id)
);
CREATE TABLE person (
    id bigint NOT NULL,
    first_name_id bigint NOT NULL,
    last_name_id bigint NOT NULL,
    CONSTRAINT person_pkey PRIMARY KEY (id),
    CONSTRAINT first_name FOREIGN KEY (first_name_id)
        REFERENCES name (id),
    CONSTRAINT last_name FOREIGN KEY (last_name_id)
        REFERENCES name (id)
);
Given this schema, you’d have to use something like SELECT CONCAT(first.name, ' ', last.name) everywhere you wanted a full name, together with a join along the foreign keys.
Even this small example becomes tiresome pretty fast. It’s worse for more complex cases and gets even more complicated when you consider computed or aggregate functions.
The WITH statement lets you extract the complications from your query and get them over with first. A query for full name substrings could look like this:
WITH full (id, name) AS (
  SELECT
    p.id AS id,
    CONCAT(first.name, ' ', last.name) AS name
  FROM
    person p
    LEFT JOIN name first
    LEFT JOIN name last
  WHERE
    first.id = p.first_name_id,
    last.id = p.last_name_id
)
SELECT id, name FROM full
WHERE name LIKE '%om Ridd%';
This behaves as if a temporary table named full with columns id, name is created and filled with the results from the first SELECT statement (the CTE), just before executing the second, main, SELECT statement. In the main SELECT you do not need to worry about the JOINs or other details from the inside of the CTE. It will appear as if it were a normal table.
Multiple CTE in one query are possible, and neither the CTE nor the main query are limited to SELECT. The PostgreSQL documentation has an example with DELETE … RETURNING and INSERT INTO … SELECT that moves rows between tables.
But so far, this is only syntactic sugar, an easier way to write something you can also express otherwise. You could achieve the same result with a (possibly materialized) view, though you’d have to modify the database schema. Or you could include everything from the CTE in your main query, but have to take great care not to trip up when using DISTINCT or GROUP BY. Or you have an ORM that will handle all the complicated queries for you and will allow reuse of complex expressions.
Then everything changes when you learn about WITH RECURSIVE. The magic consists of two building blocks: First, a WITH RECURSIVE statement may refer to itself. That is, in the SELECT that fills data into your imaginary temporary table you can read data from the imaginary temporary table. This, in itself, is not very useful, since the table starts out empty. The second building block is extending the CTESELECT to include data from the start.
The canonical use case of a recursive query looks like this:
WITH RECURSIVE my_cte AS (
  SELECT ... /* base case*/
    FROM somewhere_else
    WHERE ...
  UNION
  SELECT ... /* recursive step */
    FROM somewhere_else JOIN my_cte
    WHERE ...
)
SELECT * FROM my_cte;
The two SELECT statements in the CTE perform the functions of base case and recursive step in the definition of recursion. The semantics of WITH RECURSIVE is such that it repeats the query, storing results in the imaginary temporary table, until no new rows are being added. In other words, the stop condition is implicitly fixed and cannot be altered. You have to make sure that it terminates eventually, for example with a LIMIT clause.
An artificial example would be to create a sequence of numbers:
WITH RECURSIVE numbers (n) AS (
  SELECT 1 AS n
  UNION
  SELECT numbers.n + 1 AS n
    FROM numbers
)
SELECT * FROM numbers LIMIT 10;
This example shows that the base case needn’t necessarily come from another table. You can also see that in most simple cases the final, main, SELECT is just a dummy SELECT * (in this case with an added LIMIT) because most of the heavy lifting is being done in the CTE.
Recursive CTEs allow SQL to do things not possible without. A prime example is operating on trees in adjacency list form. This is the simplest and most obvious way to represent hierarchical data, but without recursive CTEs it’s not possible to directly express some common queries2, such as retrieving all ancestors of a node.
To illustrate here’s an example with the required basics of a simple hierarchical tree structure:
CREATE TABLE node (
    id bigint NOT NULL,
    parent_id bigint,
    name character varying (50) NOT NULL,
    CONSTRAINT node_pkey PRIMARY KEY (id),
    CONSTRAINT parent FOREIGN KEY (parent_id)
        REFERENCES node (id)
);
Every node has a name and an optional foreign key reference to its parent node. It’s very easy to query for a node’s parent node, or all child nodes of a specific node. All other queries are more complicated, or impossible, without a recursive CTE. Let’s take this fictional table:
id
name
parent_id
1
Enoch
NULL
2
Methuselah
1
3
Lamech
2
4
Noah
3
5
Shem
4
6
Ham
4
7
Japeth
4
To get all children of Noah:
SELECT child.name
  FROM node child
    JOIN node parent ON child.parent_id = parent.id
  WHERE parent.name = 'Noah';
To get Lamech’s father:
SELECT parent.name
  FROM node child
    JOIN node parent ON child.parent_id = parent.id
  WHERE child.name = 'Lamech';
You could extend the queries with additional JOINs to also handle grandparents, great-grandparents and so on, but it’s impossible in normal SQL to handle arbitrarily long chains of ancestors or descendants. Now consider this recursive query for all of Japeth’s ancestors:
WITH RECURSIVE ancestors (id, name, parent_id) AS (
  SELECT id, name, parent_id
    FROM node
    WHERE name = 'Japeth'
  UNION
  SELECT parent.id, parent.name, parent.parent_id
    FROM node parent
      JOIN ancestors child ON parent.id = child.parent_id
)
SELECT name FROM ancestors;
The second SELECT is a bit confusing. Here’s what happens: At first the imaginary temporary table contains only one row, corresponding to Japeth, the starting point for the following steps. The second SELECT then, for every node already in ancestors (now aliased to child, because these are all children considered so far), finds its parent from node and adds it to the ancestors.
So at every step the ancestors imaginary temporary table contains a set of all parents discovered so far, and all their parents (that is, all nodes that consider the existing nodes their child) are added until no more new parents are discovered.
A common variant is to include a path length variable to quantify the degree of relationship (and for example also be able to exactly query for all paths of a specific length). Another technique is to not pass through the entire row in the CTE, but only operate on the primary keys and then JOIN for the remaining columns later. Let’s look at an example for all descendants of Methuselah:
WITH RECURSIVE descendants (id, n) AS (
  SELECT id, 0
    FROM node
    WHERE name = 'Methuselah'
  UNION
  SELECT child.id, parent.id+1
    FROM node child
      JOIN descendants parent ON parent.id = child.parent_id
)
SELECT descendants.n, node.name
  FROM descendants
    LEFT JOIN node ON descendants.id = node.id;
You should see a common pattern to keep in mind: In the second SELECT the node object (called child) conceptually matches our CTE name (descendants), while the CTE reference is the reverse (parent)! We’re adding a node child for every parent already in the CTE.
Bonus Round: CTEs in Django
The django-cte package allows using CTEs in the Django ORM with the normal query API. The equivalent Django code for the last example looks like this:
# model.py
from django.db import models
from django_cte import CTEManager

class Node(models.Model):
  objects = CTEManager()
  id = AutoField(primary_key=True)
  name = models.CharField(max_length=50, null=False)
  parent = models.ForeignKey("self", null=True, on_delete=CASCADE)
In Django all database expressions need to start with a QuerySet.
The django_cte.With object wraps a QuerySet to allow additional methods, including with_cte() which adds the common table expression. Remember that in SQL the CTE goes before the main query (the QuerySet), which might be confusing here.
In order to map the self-referential nature of WITH RECURSIVE to Python syntax, django_cte.With.recursive() takes a callable that produces a QuerySet. The callable receives a reference to the CTE.
django_cte.With.recursive() needs to be JOINed to the underlying Model to be useful. You also need to .annotate() any computed columns from your CTE to use them outside of the CTE.
We’ve recently begun dockerizing our applications in an effort to make development and deployment easier. One of the challenges was establishing a good baseline Dockerfile which can maximize the benefits of Dockers caching mechanism and at the same time provide minimal application images without any superfluous contents.
The basic installation flow for any Django project (let’s call it foo) is simple enough:
Preconditions (click to expand)
The foo project has a Django settings module, which contains suitable default settings, especially with regards to the database connection. A requirements.txt file lists all project dependencies. The pip command should be executed in a Python virtual environment (or it may be executed as root in a Docker container).
(Note: In this blog post we’ll mostly ignore the commands to actually get the Django project running within a web server. We’ll end up using gunicorn with WSGI, but won’t comment further on it.)
This sequence isn’t suitable for a Dockerfile as-is, because the final command in the sequence creates the database within the container image. Except for very specific circumstances this is likely not desired. In a normal deployment the database is located either on a persistent volume mounted from outside, or in another container completely.
First lesson: The Django migrate command needs to be part of the container start script, as opposed to the container build script. It’s harmless/idempotent if the database is already fully migrated, but necessary on the first container start, and on every subsequent update that includes database migrations.
Baseline Dockerfile
A naive Dockerfile and accompanying start script would look like this:
Preconditions (click to expand)
A requirements.txt with all required Python packages to install exists, as well as a foo.wsgi file to load the WSGI application.
# Dockerfile
FROM python:slim
ENV DJANGO_SETTINGS_MODULE foo.settings
RUN mkdir -p /app
WORKDIR /app
COPY . .
RUN pip install -r requirements.txt gunicorn
RUN python manage.py collectstatic
RUN python manage.py compilemessages
ENTRYPOINT ["/app/docker-entrypoint.sh"]
Large image size. The entire source checkout of our application will be in the final docker image. Also, depending on the package requirements we may need to apt-get install a compiler or development package before executing pip install. These will then also be in the final image (and on our production machine).
Long re-build time. Any change to the source directory will invalidate the Docker cache starting with line 6 in the Dockerfile. The pip install will be executed fully from scratch every time.
(Note: We’re using the slim Python docker image. The alpine image would be even smaller, but its use of the musl C library breaks some Python modules. Depending on your dependencies you might be able to swap in python:alpine instead of python:slim.)
Improved Caching
Docker caches all individual build steps, and can use the cache when the same step is applied to the same current state. In our naive Dockerfile all the expensive commands are dependent on the full state of the source checkout, so the cache cannot be used after even the tiniest code change.
The common solution looks like this:
# Dockerfile
FROM python:slim
ENV DJANGO_SETTINGS_MODULE foo.settings
RUN mkdir -p /app
WORKDIR /app
COPY requirements.txt .
RUN pip install -r requirements.txt gunicorn
COPY . .
RUN python manage.py collectstatic
RUN python manage.py compilemessages
ENTRYPOINT ["/app/docker-entrypoint.sh"]
In this version the pip install command on line 7 can be cached until the requirements.txt or the base image change. Re-build time is drastically reduced, but the image size is unaffected.
Building with setup.py
If we package up our Django project as a proper Python package with a setup.py, we can use pip to install it directly (and could also publish it to PyPI).
If the setup.py lists all project dependencies (including Django) in install_requires, then we’re able to execute (for example in a virtual environment):
pip install .
This will pre-compile and install all our dependencies, and then pre-compile and instal all our code, and install everything into the Python path. The main difference to the previous versions is that our own code is pre-compiled too, instead of just executed from the source checkout. There is little immediate effect from this: The interpreter startup might be slightly faster, because it doesn’t need to compile our code every time. In a web-app environment this is likely not noticeable.
But because our dependencies and our own code are now properly installed in the same place, we can drop our source code from the final container.
(We’ve also likely introduced a problem with non-code files, such as templates and graphics assets, in our project. They will by default not be installed by setup.py. We’ll take care of this later.)
Due to the way Docker works, all changed files of every build step cumulatively determine the final container size. If we install 150MB of build dependencies, 2MB of source code and docs, generate 1MB of pre-compiled code, then delete the build dependencies and source code, our image has grown by 153MB.
This accumulation is per step: Files that aren’t present after a step don’t count towards the total space usage. A common workaround is to stuff the entire build into one step. This approach completely negates any caching: Any change in the source files (which are necessarily part of the step) also requires a complete redo of all dependencies.
Enter multi-stage build: At any point in the Dockerfile we’re allowed to use a new FROM step to create a whole new image within the same file. Later steps can refer to previous images, but only the last image of the file will be considered the output of the image build process.
How do we get the compiled Python code from one image to the next? The Docker COPY command has an optional --from= argument to specify an image as source.
Which files do we copy over? By default, pip installs everything into /usr/local, so we could copy that. An even better approach is to use pip install --prefix=... to install into an isolated non-standard location. This allows us to grab all the files related to our project and no others.
Preconditions (click to expand)
The Django configuration must set STATIC_ROOT="/app/static.dist". A setup.py must be present to properly install our project. All dependency information needs to be in setup.py, no requirements.txt is used.
# Dockerfile
FROM python:slim as common-base

ENV DJANGO_SETTINGS_MODULE foo.settings

# Intermediate image, all compilation takes place here
FROM common-base as builder

RUN pip install -U pip setuptools

RUN mkdir -p /app
WORKDIR /app

RUN apt-get update && apt-get install -y build-essential python3-dev
RUN mkdir -p /install

COPY . .

RUN sh -c 'pip install --no-warn-script-location --prefix=/install .'
RUN cp -r /install/* /usr/local
RUN sh -c 'python manage.py collectstatic --no-input'

# Final image, just copy over pre-compiled files
FROM common-base

RUN mkdir -p /app
COPY docker-entrypoint.sh /app/
COPY --from=builder /install /usr/local
COPY --from=builder /app/static.dist /app/static.dist

ENTRYPOINT ["/app/docker-entrypoint.sh"]
This will drastically reduce our final image size since neither the build-essential packages, nor any of the source dependencies are part of it. However, we’re back to our cache-invalidation problem: Any code change invalidates all caches starting at line 17, requiring Docker to redo the full Python dependency installation.
One possible solution is to re-use the previous trick of copying the requirements.txt first, in isolation, to only install the dependencies. But that would mean we need to manage dependencies in both requirements.txt and setup.py. Is there an easier way?
Multi-Stage, Cache-Friendly Build
The command setup.py egg_info will create a foo.egg-info directory with various bits of information about the package, including a requirements.txt.
We’ll execute egg_info in an isolated image, copy the requirements.txt to a new image (in order to be independent from changes in setup.py other than the list of requirements), then install dependencies using the generated requirements.txt. Up to here these steps are fully cacheable unless the list of project dependencies changes. Afterwards we’ll proceed in the usual fashion by copying over the remaining source code and installing it.
(One snap: The generated requirements.txt also contains all possible extras listed in setup.py, under bracket separated sections such as [dev]. pip cannot handle that, so we’ll use grep to cut the generated requirements.txt at the first blank line.)
Preconditions (click to expand)
The Django configuration must set STATIC_ROOT="/app/static.dist". All dependencies for production use are in the normal setup.py dependencies, and not in extras.
# Dockerfile
FROM python:slim as common-base

ENV DJANGO_SETTINGS_MODULE foo.settings

FROM common-base as base-builder

RUN pip install -U pip setuptools

RUN mkdir -p /app
WORKDIR /app

# Stage 1: Extract dependency information from setup.py alone
#  Allows docker caching until setup.py changes
FROM base-builder as dependencies

COPY setup.py .
RUN python setup.py egg_info

# Stage 2: Install dependencies based on the information extracted from the previous step
#  Caveat: Expects an empty line between base dependencies and extras, doesn't install extras
# Also installs gunicon in the same step
FROM base-builder as builder
RUN apt-get update && apt-get install -y build-essential python3-dev
RUN mkdir -p /install
COPY --from=dependencies /app/foo.egg-info/requires.txt /tmp/
RUN sh -c 'pip install --no-warn-script-location --prefix=/install $(grep -e ^$ -m 1 -B 9999 /tmp/requires.txt) gunicorn'

# Everything up to here should be fully cacheable unless dependencies change
# Now copy the application code

COPY . .

# Stage 3: Install application
RUN sh -c 'pip install --no-warn-script-location --prefix=/install .'

# Stage 4: Install application into a temporary container, in order to have both source and compiled files
#  Compile static assets
FROM builder as static-builder

RUN cp -r /install/* /usr/local

RUN sh -c 'python manage.py collectstatic --no-input'

# Stage 5: Install compiled static assets and support files into clean image
FROM common-base

RUN mkdir -p /app
COPY docker-entrypoint.sh /app/
COPY --from=builder /install /usr/local
COPY --from=static-builder /app/static.dist /app/static.dist

ENTRYPOINT ["/app/docker-entrypoint.sh"]
Addendum: Handling data files
When converting your project to be installable with setup.py, you should make sure that you’re not missing any files in the final build. Run setup.py egg_info and then check the generated foo.egg-info/SOURCES.txt for missing files.
A common trip-up is the distinction between Python packages and ordinary directories. By definition a Python package is a directory that contains an __init__.py file (can be empty). By default setup.py only installs Python packages. So make sure you’ve got __init__.py files also on all intermediate directory levels of your code (check in management/commands, for example).
If your project uses templates or other data files (not covered by collectstatic), you need to do two things to get setup.py to pick them up:
Set include_package_data=True in the call to setuptools.setup() in setup.py.
Add a MANIFEST.in file next to setup.py that contains instructions to include your data files. The most straightforward way for a template directory is something like recursive-include foo/templates *
The section on Including Data Files in the setuptools documentation covers this in more detail.
I have a Django based project, and am doing unit tests with py.test. To debug a test failure it’s sometimes useful to see the actual SQL queries that Django emitted, which is surprisingly hard. I assumed that that would be such an obvious and common need, that a simple switch (for pytest-django) or easy plugin would exist to simply output SQL queries as they are executed.
It is a common need alright (1, 2, 3), but the correct solution is surprisingly unwieldy1.
For one, there is no existing helper or plugin. There are helpers and plugins to count queries and assert a certain query count, which as a side effect track all queries and print the executed queries on query count assertion failure, but I’ve yet to find any case where that would be useful to me. More importantly it’s useless for the exact case here: The stored list of queries is only printed if the expected query count is not matched, not in any other case, such as, say, a failing unit test which you’d want to debug by inspecting the queries that were executed.
Therefore: Fuck it, let’s do it live. Django tracks all queries in the connection object, but in general only if DEBUG=True. For various reasons, tests are executed with DEBUG=False, which is a good thing, since you want to test close to production. Django does provide a context helper to temporarily enable query tracking on a connection which we’ll use instead.
Putting it together, we need to transform a humble test such as
@pytest.mark.django_db
def test_frobnicate_foo(foo):
    from django.db import connection
    from django.test.utils import CaptureQueriesContext
    with CaptureQueriesContext(connection):
        assert foo.frobnicate(), connection.queries[0]['sql']
in order to see the value of the first SQL query in case of assertion failure.
At some point someone™ should write a generic plugin to do that.
There are several incorrect solutions on StackOverflow, such as the one that starts with “First, subclass TestCase”, which doesn’t apply to py.test, or the ever helpful “try using django-debug-toolbar”, which doesn’t apply to unit tests in general. ↩