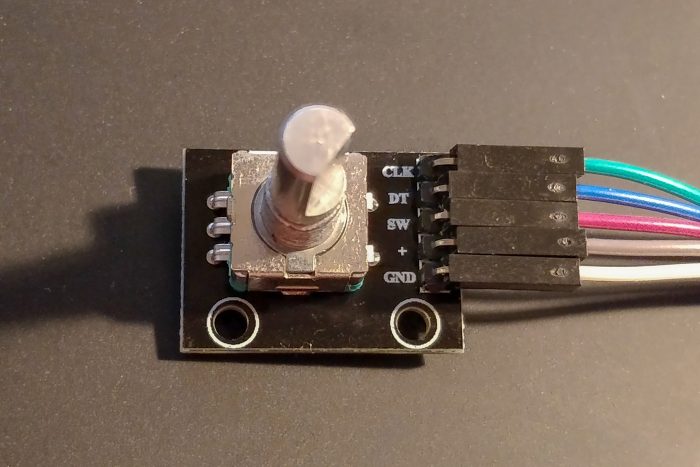
Henryk Plötz

Calculating an RSA Public Key from Two Signatures

Interesting problem: You have RSA signatures and the signed data, and want to know the RSA public key that can be used to verify the signatures. For older signature schemes this is possible, if you have at least two signatures (or an oracle that can provide signatures on request).

Math is not my strong suit, but I found the necessary formula in this Cryptography StackExchange post: RSA public key recovery from signatures. It has the general idea, but is light on details and actual code.

Tools:

  • OpenSSL to generate examples
  • SageMath for the actual calculations. It has an absolutely wonderful Jupyter notebook interface.

First, let’s generate an example key and two example files. We’ll use 512 bits RSA for this example, which is about the minimum key size we can use, just to keep the examples short (in both screen real estate and calculation size). Don’t worry: while the calculation is ~30 seconds for 512 bits RSA, it’ll only grow to ~2.5 minutes for real-world 2048 bits RSA.

$ echo "Hallo, Welt" > hallowelt.txt
$ echo "Hallo, Otto" > hallootto.txt
$ openssl genrsa 512 > privkey.pem

RSA signatures are complicated beasts. In theory, you only have to hash the input and apply the RSA operation with the private key (that is, ‘decrypt’ it), but for various reasons this is highly insecure and never done in practice.

Instead, we’ll let OpenSSL handle the generation of signatures for our examples:

$ openssl dgst < hallowelt.txt -out hallowelt.txt.sig -sign privkey.pem
$ openssl dgst < hallootto.txt -out hallootto.txt.sig -sign privkey.pem

The resultant *.sig files are 64 bytes each, matching the 512 bit RSA modulus.

To better understand the RSA signature generation process (and prepare the next step), let’s look ‘into’ the signatures:

$ openssl rsautl -encrypt -inkey privkey.pem -in hallowelt.txt.sig -raw | hd
00000000  00 01 ff ff ff ff ff ff  ff ff ff ff 00 30 31 30  |.............010|
00000010  0d 06 09 60 86 48 01 65  03 04 02 01 05 00 04 20  |...`.H.e....... |
00000020  3e 6f f8 06 a5 b4 e7 e6  d7 4d 26 7f e3 db 90 a2  |>o.......M&.....|
00000030  e2 bc a3 70 e3 db 9b 10  73 fd 55 e1 06 a1 0c 2a  |...p....s.U....*|
$ openssl rsautl -encrypt -inkey privkey.pem -in hallowelt.txt.sig -raw | openssl asn1parse -offset 13 -inform der
    0:d=0  hl=2 l=  49 cons: SEQUENCE
    2:d=1  hl=2 l=  13 cons: SEQUENCE
    4:d=2  hl=2 l=   9 prim: OBJECT            :sha256
   15:d=2  hl=2 l=   0 prim: NULL
   17:d=1  hl=2 l=  32 prim: OCTET STRING      [HEX DUMP]:3E6FF806A5B4E7E6D74D267FE3DB90A2E2BCA370E3DB9B1073FD55E106A10C2A
$ openssl dgst -sha256 hallowelt.txt
SHA256(hallowelt.txt)= 3e6ff806a5b4e7e6d74d267fe3db90a2e2bca370e3db9b1073fd55e106a10c2a

The first step ‘encrypts’ the signature (that is: applies the RSA operation with the public key) and prints a hexdump of the result. In the hexdump we see:

  • Some padding: 00 01 ff ff … ff 00
  • An ASN.1 structure, consisting of 
    • A sequence (tag 30, 49 bytes), of 
      • A sequence (tag 30, 13 bytes), of 
        • An object identifier (tag 06, 9 bytes) for sha256
        • A NULL value (tag 05, 0 bytes)
      • An octet string (tag 04, 32 bytes) with 
        • The SHA-256 hash (3e6ff8…a10c2a) of the signed data

The signature follows the PKCS#1 standard for RSA signatures. All the extra stuff serves to distinguish signatures with SHA-256 from signatures with other hashes, and to prevent some attacks on the padding. It’s also the reason why we can’t go much below 512 bits RSA if we want to demo with SHA-256. (It must be noted that PKCS#1 padding shouldn’t be used anymore. The new standard is RSASSA-PSS, which has a robust security proof, but also is randomized and completely foils the technique in this blog post.)

Let’s define the first set of functions to generate this sort of padding:

import hashlib
def pkcs1_padding(size_bytes, hexdigest, hashfn):
    oid = {hashlib.sha256: '608648016503040201'}[hashfn]
    result = '06' + ("%02X" % (len(oid)/2)) + oid + '05' + '00'
    result = '30' + ("%02X" % (len(result)/2)) + result
    
    result = result + '04' + ("%02X" % (len(hexdigest)/2)) + hexdigest
    result = '30' + ("%02X" % (len(result)/2)) + result
    
    result = '0001' + ('ff' * int(size_bytes - 3 - len(result)/2) ) + '00' + result
    return result

def hash_pad(size_bytes, data, hashfn):
    hexdigest = hashfn(data).hexdigest()
    return pkcs1_padding(size_bytes, hexdigest, hashfn)

A simple test:

hash_pad(64, "Hallo, Welt\n", hashlib.sha256)

‘0001ffffffffffffffffffff003031300D0609608648016503040201050004203e6ff806a5b4e7e6d74d267fe3db90a2e2bca370e3db9b1073fd55e106a10c2a’

To perform the gcd calculation, you need for each signature the corresponding signed data, the hash function used, and the public exponent of the RSA key pair. Both hash function and public exponent may need to be guessed, but the hash is usually SHA-256, and the exponent is usually 0x10001 (65537) or 3.

The full code is as follows:

import binascii, hashlib
def message_sig_pair(size_bytes, data, signature, hashfn=hashlib.sha256):
    return ( Integer('0x' + hash_pad(size_bytes, data, hashfn)), Integer('0x' + binascii.hexlify(signature)) )

def find_n(*filenames):
    data_raw = []
    signature_raw = []
    for fn in filenames:
        data_raw.append( open(fn, 'rb').read() )
        signature_raw.append( open(fn+'.sig', 'rb').read() )
    size_bytes = len(signature_raw[0])
    if any(len(s) != size_bytes for s in signature_raw):
        raise Exception("All signature sizes must be identical")
    
    for hashfn in [hashlib.sha256]:
        pairs = [message_sig_pair(size_bytes, m, s, hashfn) for (m,s) in zip(data_raw, signature_raw)]
        for e in [0x10001, 3, 17]:
            gcd_input = [ (s^e - m) for (m,s) in pairs ]
            result = gcd(*gcd_input)
            if result != 1:
                return (hashfn, e, result)

If we test it, we’ll find:

time hashfn, e, n = find_n('hallowelt.txt', 'hallootto.txt');

CPU times: user 27.3 s, sys: 609 ms, total: 27.9 s
Wall time: 28.4 s

print hex(n)

d9dac509621ed7f27b4868ab1874f649778c63f11000366e827cf18fd70db1e27f39902524e29aa2bfb3167627caaa408e17e907ee3c44e0321dc77fb8890075

And compare to the ground truth of our example:

$ openssl rsa -in privkey.pem -noout -text
Private-Key: (512 bit)
modulus:
    00:d9:da:c5:09:62:1e:d7:f2:7b:48:68:ab:18:74:
    f6:49:77:8c:63:f1:10:00:36:6e:82:7c:f1:8f:d7:
    0d:b1:e2:7f:39:90:25:24:e2:9a:a2:bf:b3:16:76:
    27:ca:aa:40:8e:17:e9:07:ee:3c:44:e0:32:1d:c7:
    7f:b8:89:00:75
publicExponent: 65537 (0x10001)
[...]

Finally, to create a standard format PEM public key from our n and e:

from Crypto.PublicKey import RSA
print RSA.construct( (long(n), long(e)) ).exportKey(format='PEM')

—–BEGIN PUBLIC KEY—–
MFwwDQYJKoZIhvcNAQEBBQADSwAwSAJBANnaxQliHtfye0hoqxh09kl3jGPxEAA2
boJ88Y/XDbHifzmQJSTimqK/sxZ2J8qqQI4X6QfuPETgMh3Hf7iJAHUCAwEAAQ==
—–END PUBLIC KEY—–

Which is exactly what we would get from OpenSSL:

$ openssl rsa -in privkey.pem -pubout
writing RSA key
-----BEGIN PUBLIC KEY-----
MFwwDQYJKoZIhvcNAQEBBQADSwAwSAJBANnaxQliHtfye0hoqxh09kl3jGPxEAA2
boJ88Y/XDbHifzmQJSTimqK/sxZ2J8qqQI4X6QfuPETgMh3Hf7iJAHUCAwEAAQ==
-----END PUBLIC KEY-----

Warning: The gcd method may sometimes return not n but a product k * n for a smallish value of k. You may need to check for small prime factors and remove them.

The code is available as a SageMath Jupyter notebook: rsa_find_n.ipynb (all example files).

The find_n function is written to accept arbitrary arguments (must be filenames where the file contains the data and the filename appended with .sig contains the signature) but will only work when given exactly two arguments. FactHacks: Batch gcd has a batchgcd_faster function that will work on an arbitrary number of arguments (but is slower in the 2‑argument case).

Power Sockets of India

I almost always have my trusty earthed world travel adapter with me when I’m traveling, which allows me to have a proper German Schutzkontakt power socket in most parts of the world:
Earthed World Travel AdapterThat’s why I was very confused when, on a recent trip to India, I wasn’t immediately able to plug in, and became fascinated with the multitude of different power sockets I saw over there.

The first type of socket I encountered were these, and they match none of the configurations on my adapter:Indian Power Sockets 1As it turns out, these are dual sockets for IS 1293 (which basically is a form of the old British standard BS 546). The old British system of sockets had different sockets and plugs for different amperages! A 5A plug would fit only in a 5A socket, and a 15A plug was different and would fit only in a 15A socket. Since this is a very stupid usability problem (what do you do if you want to connect a 5A appliance but only have a 15A socket?), apparently all newer sockets would always be rated at the higher amperage and include multiple holes to also connect lower amperage plugs.

I’ve never seen this type when visiting the UK, and obviously my adapter doesn’t support that. So, no power for me. Also note that even though the lowermost set of holes would in principle be able to receive a Europlug, this doesn’t work, because there’s a plastic shutter that is actuated by the grounding pin.

The next type of socket I saw had a slightly more intelligent layout:
Indian Power Socket 2This one also supports both IS 1293 pin configurations, but by slightly moving the lower amperage holes they also made this thing fit a ‘normal’ British BS 1363 (aka Type G) plug which I had available on my adapter.

The sockets in my hotel were obviously geared more towards non-domestic plugs:
Indian Power Socket 3This will fit: Europlug, British BS 1363, IS 1293 (not sure if it’s good for both amperage configurations or just one of them), American NEMA, and Australian.

The sockets at the airport were a slightly advanced version, adding a center pin to the Europlug (not sure if Brazilian, Italian, or Swiss):
Indian Power Sockets 4But the true king of sockets I found in the offices I visited:
Indian Power Socket 5This thing is compatible with any of the standards listed above, including all possible configurations of my travel adapter. Or, in the words of a wise man:

The nice thing about standards is that you have so many to choose from. Andrew S. Tanenbaum, Computer Networks

NGINX, FastCGI, HTTPS, and WordPress

I have a setup in which a frontend nginx server handles multiple names on one IP for HTTP port 80 and HTTPS port 443 (through SNI) and forwards the requests to distinct backend HTTP servers, based on name and/or path. One of these backends is a WordPress installation, and that one is problematic: WordPress tends to insert absolute URLs into everything. And since it doesn’t know that the frontend was accessed through HTTPS, it inserts HTTP URLs. Worse, when using the WordPress HTTPS plugin and choosing to force administrative logins through HTTPS only, you can end up with an endless redirect loop.

A quasi standard signal from frontend to backend in this case is the X‑Forwarded-Ssl HTTP header, which, when set to on, should indicate that the frontend used HTTPS. Unfortunately, WordPress ignores the header. Instead, is_ssl() only checks the HTTPS server variable (and alternatively checks the server port to be 443).

The WordPress documentation referenced above offers a simple fix by overwriting the HTTPS variable in the wp-config.php file. Instead, for nginx with FastCGI, I propose this simpler, more generic, and, in my humble opinion, more elegant fix:

The default nginx FastCGI configuration includes a file fastcgi_params, which, among others, has this line:

fastcgi_param   HTTPS                   $https if_not_empty;

Below this simply add

fastcgi_param   HTTPS                   $http_x_forwarded_ssl if_not_empty;

(and of course have something along the lines of

proxy_set_header X-Forwarded-Ssl on;

in the corresponding proxy configuration on the frontend nginx)

This will set the HTTPS server variable when the X‑Forwarded-Ssl HTTP header is set, allowing all kinds of PHP programs to transparently discover that they’re used to through HTTPS.

On the Security of AES in HomeMatic

HomeMatic is a line of home automation devices that are popular in Germany and use a proprietary radio protocol (BidCoS, Bidirectional Communication Standard) on a frequency of 868MHz. Some devices allow optional use of “AES signing” for message authentication. When enabled, the execution of a command is delayed until a challenge-response process between the initiator and receiver of the command is completed. All AES capable HomeMatic devices ship with a default key, which can optionally be set to a custom value. The signing requirement is disabled by default for most devices, except for the KeyMatic/WinMatic line which includes devices for door lock and window automation which always require AES for all commands.

Before 2014 the common wisdom1 was to leave the AES key at the default value: Setting a custom key and forgetting it renders the device useless and requires it to be sent back to the manufacturer to reset it – for a fee.

Sathya Laufer and Christian Mallas demonstrated that this is trivially dangerous at the 30th Chaos Communication Congress: Within the HomeMatic universe there are LAN gateways that accept commands over Ethernet/IP and forward them through BidCoS to the target device. In this setup, all the BidCoS AES operations are executed by the LAN gateway. So if the target device is using the default key, an attacker can simply use a LAN gateway (which also knows the default AES key) to send arbitrary commands to that device, without bothering with any of the cryptographic details.

Later, the default AES key became known, and a reverse engineering of the authentication protocol is available (see next section), so an attacker can also use custom hardware to send commands to all devices still configured with the default key.

Michael Gernoth did a superb job of reverse engineering the authentication protocol2, but his description is mainly based on the flow to authenticate a known message. I’ll try to re-frame that here in the way that the authentication token is generated, and also generically for arbitrary message sizes. Where applicable I’ll use the same abbreviations that Michael uses (∥ is concatenation, ⊕ is XOR):

Packets
m Original message to be authenticated. Note: m = D0 ∥ D1, if the length is considered not to be part of the packet.
c Challenge message
r Response message
a ACK message
Data items
Name Description Length/bytes Packet
D0 Metadata (counter, flags, type, sender, receiver) 10 m
D1 Parameters varies m
C Challenge 6 c
P AES response 16 r
A ACK authentication 4 a
T Timestamp or counter 6

Under these definitions the calculation of the authentication messages happens as follows:

  • K’ := K ⊕ (C ∥ 00…)
  • Pd’ := AES(K’, T ∥ D0)
  • P := AES(K’, Pd’ ⊕ (D100…) )

Or, in easier terms, and likely representing the original idea, for arbitrary packet lengths:

AESCBC(IV= 00…, Key= K ⊕ (C ∥ 00…), Payload= T ∥ m)

(with the last block of the CBC calculation being output as P and the first 4 bytes of the first block as A)

While this looks like a standard (ab)use of AES-CBC as an authentication code, best as I can tell, the verification really has to happen in the very strange backwards way that Michael describes, for the simple reason that T is not transmitted and thus not available to the verifier to replicate the same calculation as the initiator.

How secure is the HomeMatic system if a custom AES key is used?

A customary simple measure for security is the number of bits an attacker must guess correctly to violate whatever security properties the system claims to have. This is related to the number of operations to execute in the attack3. Example: For an authentication mechanism with a security of 128 bits, the attacker needs to either correctly guess 128 bits (either key or authentication code) to break the system, or perform 2127 operations (random authentication attempts) to score a successful attack with a probability of ~50%.4

Under this definition a single block of AES with fully random key has a security of 128 bits. We would hope to find the same security in the HomeMatic use of AES.

CBC-MAC is generally not a recommended way to construct a message authentication code and very easy to implement wrong, for examples and a longer discussion of this aspect see this article on CBC-MAC by Matthew Green. That being said, XORing the challenge into the key prevents most of the more obvious attacks. They are enabled again, when a challenge is re-used though.

Challenge re-use

The challenge is a 6‑byte value generated by the verifier that must be random. Random number generation (RNG) with computers is hard, and RNGs in many (embedded) devices have had spectacular failures with security implications in the past: 1 2 3 4.

Now, I can’t make any assertions as to the quality of HomeMatic’s RNG, so let’s assume that it is stellar and always outputs full 48 bits of randomness. The birthday paradox then tells us that after around 224 ≈ 16.7 million tries there’s a better than even (50%) chance that a number repeats. A repeated challenge directly gives the attacker the possibility to replay a previous command.

For this attack to work with probability 50% the attacker must capture on the order of 16.7 million identical messages, and then try to get the same command executed 16.7 million times, representing a security factor of around 26 bits. Probably nothing to worry about in a radio protocol that will do at most ~5 authentications per second (the second phase alone will take 6 weeks), but a far cry from 128 bits.

The specific usage of CBC-MAC is also susceptible to an attack where the attacker can craft a valid authentication token for a message that consists of a message sniffed from the radio channel appended with attacker controlled data, see Matthew’s article linked above. However, I couldn’t think of a way to make this stick: The attacker still needs to be able to either coax the system into generating an authentication token for a different attacker chosen message, or be very limited in the message manipulations possible.

Blind guessing

Remember that T is never transmitted but apparently inferred from the protocol? That means, from an attacker’s point of view, that these bits are free. Instead of guessing 128 bits of key or authentication code, the attacker only need to guess 128–6*8=80 bits. Even if the verifier checks T to be monotonously increasing that only adds one additional bit of complexity. It works like this:

  1. Attacker sends arbitrary message m = D0 ∥ D1
  2. Verifier sends challenge C
  3. Attacker sends random answer P
  4. Verifier calculates
    • Pd’ := AES-1(K’,P) ⊕ (D100…), and
    • Pd’d := AES-1(K’, Pd’).

    Verifier then checks whether the last ten bytes of Pd’d match D0 (and maybe if the first 6 bytes are higher than the last T received).

  5. If in the previous step a match is found, the verifier executes the command and outputs A.

Note that in the protocol D1 is never checked, but used to calculate something that is checked against D0. Now: An attacker that feeds random data into P will cause random data to appear in Pd’d. There’s a chance of 1 in 280 that this random data matches D0 (and possibly: another 1 in 2 that the first 6 bytes are numerically larger than the last T).

Again: 80 is much lower than 128, so cryptographically speaking the mechanism is broken. Practically though, sending 280 requests (giving a success probability of 63% to the attacker) will take 7.6 Pa5, so that’s probably nothing to worry about.

Entropy

Internally the AES key is a binary value of 128 bits, but that’s not how it’s presented to the user in the front-end. Setting the HomeMatic security key requests an arbitrary text string from the user, which is then hashed with MD5 and the resulting hash is used as the AES key.

A careless user might not worry too much about this key, and the on-screen prompt only reminds them to use at least 5 characters. Even under the best of circumstances, one typeable character has only about 6 bits of entropy. The minimum security recommended by the user interface therefore is equivalent to 5*6 = 30 bits. Also: An attacker can execute an offline dictionary attack on the key after intercepting one or a few radio messages. Execution rates for these kinds of attacks typically lie in the millions or billions of operations per second even on regular PC hardware (CPU and GPU), so any 5 character security key will be cracked in seconds.

Luckily this isn’t a flaw by design: The user needs to make sure to chose a fully random key with at least 128 bits of entropy, for example in the form of 32 random hexadecimal characters.

Summary

The problems are, in order from most to least exploitable:

  1. Low entropy in the security key. Security break in seconds. Easily averted by choosing a strong key.
  2. Challenge re-use. Break may be possible within a few decades to years.
  3. Blind guessing. Break possible within a few petayears.

From a theoretical point of view, the security of the BidCoS protocol with a custom AES key is much worse than it should be. From a practical point of view it’s entirely acceptable, if the user chooses a long fully random key, and the attacker isn’t present when the key is set6.

Note: These considerations only apply to the theoretical protocol and not any particular implementation. It’s possibly, even likely, that there are exploitable bugs in some device firmware and/or that the RNG is not as good as expected. Bugs in this area generally reduce the security to the “break within minutes to seconds” category.


  1. See for example this archived article from October 2012, courtesy of the internet archive. The article was updated to say the polar opposite in January 2014. 

  2. XORing the challenge into the key is somewhat unusual, I’m not sure I would’ve found that 

  3. Theoretical computer science generally doesn’t care about constant factors. 

  4. These two notions are not identical, but close enough that, for the purposes of approximately judging system security, I’ll treat them as interchangeable for this article. 

  5. 7.6 petayears, 7 600 000 000 000 000 years 

  6. Obviously the key is transmitted over the air, encrypted with a key that the attacker already knows by induction. 

Understanding Capabilities in Linux

For some time now the Linux kernel has been supporting a capabilities(7) based permission control model. In theory this allows assigning fine-grained permissions to processes so that processes that previously required UID 0/root permissions don’t need these any more. In practice though, uptake of this feature is relatively low, and actually trying to use it is hampered by confusing vocabulary and non-intuitive semantics.

So what’s the story?

All special access permission exemptions that were previously exclusively attached to UID 0 are now associated with a capability. Examples for these are: CAP_FOWNER (bypass file permission checks), CAP_KILL (bypass permission checks for sending signals), CAP_NET_RAW (use raw sockets), CAP_NET_BIND_SERVICE (bind a socket to Internet domain privileged ports).

Capabilities can be bestowed on execution (similar to how SUID operates) or be inherited from a parent process. So in theory it should be possible to, for example, start an Apache web server on port 80 as a normal user with no root access at all, if you can provide it with the CAP_NET_BIND_SERVICE capability. Another example: Wireshark only needs the CAP_NET_RAW and CAP_NET_ADMIN capabilities. It is highly undesirable to run the main UI and protocol parsers as root, and slightly less desirable to run dumpcap, which is the helper tool that Wireshark actually uses to sniff traffic, as root. Instead, the preferred installation method on Debian systems is to set the dumpcap binary up so that it automatically gains the required privileges on execution, and then limit execution of the binary to a certain group of users.

Gaining and giving capabilities

This is the most confusing part, because a) it doesn’t behave intuitively in the “just like suid-root” mental model, and b) uses the same words for completely different functions.

Conceptually capabilities are maintained in sets, which are represented as bit masks. For all running processes capability information is maintained per thread; for binaries in the file system it’s stored in extended attributes. Thread capability sets are copied on fork() and specially transformed on execve(), as discussed below.

Several different capability sets and related variables exist. In the documentation these are treated as somewhat symmetrical for files and threads, but in reality they are not, so I’ll describe them one by one:

Thread permitted set
This is a superset of capabilities that the thread may add to either the thread permitted or thread inheritable sets. The thread can use the capset() system call to manage capabilities: It may drop any capability from any set, but only add capabilities to its thread effective and inherited sets that are in its thread permitted set. Consequently it cannot add any capability to its thread permitted set, unless it has the CAP_SETPCAP capability in its thread effective set.
Thread effective set
This is the actual set of capabilities that the kernel uses for permission checks.
Thread inheritable set
This is a set that plays a role in bequeathing capabilities to other binaries. It would more properly be called ‘bequeathable’: a capability not in this set cannot be inherited by a different binary through the inheritance process. However, being in this set does also not automatically make a binary inherit the capability. Also note that ‘inheriting’ a capability does not necessarily automatically give any thread effective capabilities: ‘inherited’ capabilities only directly influence the new thread permitted set.
File permitted set
This is a set of capabilities that are added to the thread permitted set on binary execution (limited by cap_bset).
File inheritable set
This set plays a role in inheriting capabilities from another binary: the intersection (logical AND) of the thread inheritable and file inheritable sets are added to the thread permitted set after the execve() is successful.
File effective flag
This is actually just a flag: When the flag is set, then the thread effective set after execve() is set to the thread permitted set, otherwise it’s empty.
cap_bset
This is a bounding capability set which can mask out (by ANDing) file permitted capabilities, and some other stuff. I’ll not discuss it further and just assume that it contains everything.

Based on these definitions the documentation gives a concise algorithm for the transformation that is applied on execve() (new and old relate to the thread capability sets before and after the execve(), file refers to the binary file being executed):

  • New thread permitted = (old thread inheritable AND file inheritable) OR (file permitted AND cap_bset)
  • New thread effective = new thread permitted, if file effective flag set, 0 otherwise
  • New thread inheritable = old thread inheritable

This simple definition has some surprising (to me) consequences:

  1. The ‘file inheritable set’ is not related to the ‘thread inheritable set’. Having a capability in the file inheritable set of a binary will not put that capability into the resulting processes thread inheritable set. In other words: A thread that wants to bequeath a capability to a different binary needs to explicitly add the capability to its thread inheritable set through setcap().
  2. Conversely the ‘thread inheritable set’ is not solely responsible for bequeathing a capability to a different binary. The binary also needs to be allowed to receive the capability by setting it in the file inheritable set.
  3. Bequeathing a capability to a different binary by default only gives it the theoretical ability to use the capability. To become effective, the target process must add the capability to its effective set using setcap(). Or the file effective flag must be set.
  4. A nice side effect of the simple copy operation used for the thread inheritable set: A capability can be passed in the thread inheritable set through multiple intermediate fork() and execve() calls to a target process at the end of a very long chain without becoming effective in the middle.
  5. The relevant file capability sets are those of the binary being executed. When trying to give permitted capabilities to an interpreted script, the capabilities must be in the file inheritable set of the interpreter binary. Additionally: If the script can’t/won’t call capset(), the file effective flag must be set on the interpreter binary.

Summary

I’ve tried to summarize all the possible paths that a capability can take within a Linux thread using capset() or execve(). (Note: fork() isn’t shown here, since all capability information is simply duplicated when forking.)

Linux Capabilities: Possible capability transmission paths

Rescuing Full Archives From A Google Group

A project I’m newly affiliated with has used Google Groups for all their private group communication so far. Since I’m not a big fan of storing private data in the proprietary data silos of cloud providers, this is a situation I want to rectify. Why use Google Groups when you can set up GNU mailman yourself and not have all data and meta-data pass through Google?

There’s one caveat: While Google provides an export of group member lists, there’s no export functionality for the current archive. Which in this case represented 2 years’ worth of fruitful discussion and organizational knowledge. Some tools exist to try and dump all of a group’s archive, but none really agreed with me. So I rolled my own.

I give to you: https://github.com/henryk/gggd

Inside you’ll find a Python script that uses the lynx browser to access the Google Groups API (so it can work with a Google login cookie as an authenticated user) and will enumerate all messages in a group’s archive and download each into a different file as a standard RFC (2)822 message. While programming this I found that some of the messages are being returned from the API in a mangled form, so I also wrote a tool (can be called with an option from the downloader) that can partially reverse this mangling.

With the message files from my download tool, formail from the procmail package, and some shell scripting I was able to generate an mbox file with the entire groups’ archives which could be easily imported into mailman.

owncloud – Cache Static Assets (CSS/Javascript)

To whom it might be useful,

I recently set up an owncloud instance for private use and found that the load time was abysmal. Showing the default “Files” page spends ~21 seconds for ~140 HTTP requests1, even though my HTTP setup is already quite pimped (with SPDY and all). What is worse: The time does not reduce on subsequent visits. No cache-control headers are sent and all the Javascript and CSS resources are requested again. There is ETag and If-None-Match in place, so most of the requests just yield a 304 Not Modified response, but they still block the loading process. Which is even less understandable if you look at the requests: All Javascript and CSS resources are using a “?v=md5($owncloud_version)” cache buster, so they would be fully cacheable with no ill effects.

For a standard owncloud installation in /var/www with Apache: Open your /var/www/owncloud/.htaccess in a text editor and append the following lines (Update 2014-10-09 18:35 UTC: Add missing \ before .)

<IfModule mod_headers.c>
<FilesMatch "\.(css|js)$">
Header set Cache-Control "max-age=2592000, public"
</FilesMatch>
</IfModule>

then in a shell make sure that the headers module is enabled in Apache:

sudo a2enmod headers

and restart Apache as prompted by a2enmod.

The next time you load the owncloud web interface your browser will be told to cache the Javascript and CSS resources for 30 days, and the time after that it won’t request them again. The “Files” app load time dropped from 21 to 6 seconds for me – with 16 instead of ~140 requests.  That’s almost reasonable!


  1. In Firefox: Press Ctrl-Shift‑Q to bring up the Network web developer tool to watch the drama unfold in its entirety. 

DJB’s tinydns and DNSSEC

While upgrading my server infrastructure I noticed that I really should be providing IPv6 not only for the services (like this HTTP/HTTPS site) but also for the DNS itself, and also at some point might want to enable DNSSEC for my domain to join in the fight with DANE against the mafia that is the global X.509 certification authority infrastructure.

My DNS servers have been powered by DJB’s most excellent djbdns package1 since I first started hosting theses services myself. The software package truly is fire and forget: You set it up once and it will continue working, with no maintenance or pesky software upgrades, year after year. That’s one thing Dan’s software is famous for.

The other thing everyone knows about his software is that if you want to add features, you’ll have to apply third-party patches. A well-known patch set for IPv6 in tinydns is available from my friend Fefe, and is also included in Debian-based distributions in a package called dbndns. Peter Conrad wrote DNSSEC support for tinydns (explicitly basing on Fefe’s IPv6 patches).

When trying to set that up, I quickly became frustrated: Applying several patches from several distinct locations one after the other doesn’t seem like the way software should be distributed in 2014. Also, Peter’s code has a few easily patched problems.

So I’ve set up github.com/henryk/tinydnssec/tree/dnssec‑1.05-test27-8ubuntu1-tinydnssec_1.3. Each commit is either the import of a tarball, application of a patch or a fix from me. I have signed the tag with my GPG key. You can easily use the github provided download link dnssec‑1.05-test27-8ubuntu1-tinydnssec_1.3.zip.

The steps I took, in order:

  1. Import djbdns‑1.05.tar.gz. No signature check was made since no signed version is available, but I checked that I was using the same package as Ubuntu/Debian.
  2. Apply djbdns‑1.05-test27.diff.bz2. I checked Fefe’s signature and verified his key’s fingerprint using a separate channel.
  3. Apply 0003-djbdns-misformats-some-long-response-packets-patch‑a.diff from the Ubuntu package.
  4. Apply 0004-dnscache.c‑allow-a-maximum-of-20-concurrent-outgoing.diff from the Ubuntu package.
  5. Apply djbdns-ipv6-make.patch. No signature check was done, but the patch is trivial.
  6. Import tinydnssec‑1.05–1.3.tar.bz2. I checked Peter’s signature and verified his key through the web of trust.
  7. Apply djbdns‑1.05-dnssec.patch from the aforementioned package.
  8. Small fixup for conf-cc and conf-ld: Do not use diet for compilation or linking (was introduced with Fefe’s patch).
  9. Small fixup for tinydns-sign.pl: Use Digest::SHA instead of Digest::SHA1.
  10. Small fixup for run-tests.sh: GNU tail does not understand the +n syntax.
  11. Small fixup for run-tests.sh: Need bash, say so (not all /bin/sh are bash).

The resulting source builds fine, and the tests mostly run fine. Tests 1 and 7 each fail in 50% of cases due to the randomized record ordering in the tinydns output which is not accounted for in the test code.

djbdns is in the public domain, tinydnssec is published under GPL‑3, which means that the combined source also falls under GPL‑3.


  1. The software package is ‘djbdns’, among the servers in it are ‘tinydns’ to host an authoritative UDP DNS server and ‘axfrdns’ to host a TCP DNS server 

Setting Arbitrary Baud Rates On Linux

Historically, baud rates on UNIX –later: POSIX– systems have been manipulated using the tcgetattr()/tcsetattr() functions with a struct termios and a very limited set of possible rates identified by constants such as B0, B50, B75, B110, …, through B9600. These have later been extended for select values such as B38400 and B115200. Hardware has since evolved to be able to use almost any value as a baud rate, even much higher ones. The interface however, has never been properly repaired.

Linux used a technique called “baud rate aliasing” to circumvent that problem in the past: A special mode can be set so that a request for B38400 would not actually set 38.4kBaud but instead a separately defined other baud rate with names like spd_hi (“high”?) for 57.6kBaud, spd_shi (“super high”?) for 230kBaud or spd_warp for 460kBaud. These names may give you an idea how old and limited this interface is.

For this reason there is a new ioctl interface to set an arbitrary baud rate by actually using an integer to store the requested baud rate: TCGETS2/TCSETS2 using struct termios2.

Both documentation and example code for this method are sparse. A bug report to implement this in libc6 is still open. Thankfully that bug report includes example C code to use the interface directly. The constant to tell the structure that an OTHER Baud rate has been set has unwisely been called BOTHER, which, being a proper English word, makes it completely impossible to find any information on the internet about. So, to be more explicit (and hopefully be found by any future search for this topic): This is an example on how to set a custom baud rate with the BOTHER flag on Linux in Perl.

Transforming the C example into Perl code using the Perl ioctl function should be easy, right? Muahahaha. Every example on how to use Perl ioctl on the Internet (that I’ve reviewed) is wrong and/or broken. Even better: the perl distribution itself is broken in this instance. Quoth /usr/lib/perl/5.18.2/asm-generic/ioctls.ph on Ubuntu 14.04:

eval 'sub TCGETS2 () { &_IOR(ord(\'T\'), 0x2a, 1;}' unless defined(&TCGETS2);

(hint: count the number of opening and closing parentheses.)

Even if that Perl code was syntactically correct, it’s wrong in principle: The third argument to the _IOR macro should be the struct termios2 structure size. On x86_64 it’s 44 bytes, not 1.

So, I’ve written code with two purposes:

  1. Correctly use Perl’s ioctl to
  2. set a custom serial baud rate under Linux.

The definitions of both TCGETS2 and struct termios2 may be architecture dependent, so there’s a helper program in C to output the parameters for the current architecture.

All the code (set baud rate with TCSETS2 BOTHER in C, set baud rate with TCSETS2 BOTHER in Perl, C helper to output constants for the current architecture, Makefile) I released into the public domain at github.com/henryk/perl-baudrate/.

On the Difference Between RFID and NFC

What is RFID? What is NFC? What is the difference between RFID and NFC? These questions come up time and again, so let me answer them in some detail.

Both are terms that are almost never used correctly, and both have, in a general sense, something to do with communicating or radioing.

What is RFID?

Let’s start with the older term: RFID is just “radio frequency identification”. It’s not really defined, beyond being a combination of the two attributes, and, if you are so inclined, you could cite the “Identification Friend or Foe” systems invented for military airplanes in the 1930s as one of the earliest RFID systems1.

In modern times, the term RFID is almost always used to imply a system consisting of few relatively complex ‘readers’ and a larger number of relatively, or very, simple ‘transponders’, with some sort of radio signal being used to indicate the identification, or at least presence2, of the latter to the former. Now, that’s still quite abstract, so let’s add further characteristics, at each step going in the direction of the systems that most people actually mean when they say RFID with no further qualification:

  • The transponder could be active (have its own power source) or passive (be energized by the reader using some physical effect), the latter is what’s on most peoples minds in the context of RFID.
  • A passive transponder can be communicated with with radio waves through radar backscatter (ultra-high frequencies, range in the hundreds of meters, very little power available to the transponder) or, more often seen in everyday life, be inductively coupled (low to high frequencies, range less than a couple meters, possibly high power available).
  • An inductively coupled transponder could operate on a non-standardized low frequency (LF, ~120–140kHz) in a proprietary system, the standard high frequency (HF, 13.56MHz) in a proprietary system, or, most uses of the term RFID, the 13.56MHz frequency using an ISO standardized protocol.
  • The 13.56MHz RFID ISO protocols are ISO 15693, vicinity coupling, defined range less than a meter, and, more often referenced in the context of “RFID”, ISO 14443, proximity coupling, defined range less than ten centimeters.

Different properties of these general approaches lead to a very domain specific understanding of what “a normal RFID system” is: Warehouse management applications sometimes deal with ISO 15693 and more often with Gen 2 EPC (ISO 18000–6, passive backscatter, UHF: 860–960MHz). Average consumers overwhelmingly find themselves confronted with ISO 14443 systems (electronic passports, credit cards, newer corporate IDs) or proprietary HF systems (many corporate IDs). Finally, most very simple or moderately old applications quite often work with proprietary LF systems.

It’s a shaky definition process, but at least once you have determined that you are talking about ISO 14443 you’re on quite firm ground. However, this only gets you to establish communication with a transponder, possibly gather a transponder specific unique identifier, and transmit bytes back and forth. The actual command set for reading and writing, and potentially other functions such as electronic purse applications, is a completely different horseride altogether.

What is NFC?

Now, on the subject of NFC, this is even less well defined – or possibly better, depending on how you look at it. It’s a relatively new term, so there’s no firm default interpretation you could use, beside it having to do something with “near-field” and “communication” (e.g. inductive coupling and some sort of information transfer). There are, however, a couple of well defined things that bear the name NFC – none of which are usually exclusively intended by someone using the term:

  • NFCIP‑1, also known as ISO 18092 (dual-published as ECMA-340 [PDF]), which is an air interface for half-duplex communication between two entities using inductive coupling on 13.56MHz, at least one of the entities must be actively powered.
  • NFC Forum which is an industry association that publishes a set of standards, among them are: 
    • NFC Data Exchange Format (NDEF) which is compact binary data storage and message serialization format
    • NFC Record Type Definition (RTD) which is a specification format for NDEF message formats
    • A couple of RTDs that define both the message format and expected semantics of common use cases such as smart posters, business cards, etc.
    • NFC Tag Type definitions (1 through 4) that define a set of protocols for passive data storage tags and how to access NDEF messages on them

How do RFID and NFC relate?

Now comes the fun part: NFCIP‑1 is, not by accident, compatible with ISO 14443, where appropriate. Full-on NFCIP‑1 devices generally can implement both sides (now called Initiator and Target) of the communication, and so are compatible both with ISO 14443 readers (by emulating a tag) and ISO 14443 tags (by behaving as a reader). As an aside: Most vendors, while they’re on the 13.56MHz frequency anyway, also implement all the usual 13.56MHz RFID protocols in the things they call NFC chipsets, which is not at all helpful when trying to untangle the standards salad. Just because your “NFC phone” can operate with a certain tag does not mean that it’s “doing NFC” in a certain narrowly defined sense.

And even better: The NFC tag types correspond to existing 13.56MHz RFID tag products, but sometimes in a generalized version. For example tag type 2 is essentially NXP Mifare Ultralight3, but where Ultralight has a fixed 64 bytes of memory, the tag type 2 also allows arbitrary sizes bigger than 64B. And indeed, one of the most ubiquitous “NFC tag”s that you can buy now are NFC type 2 tags which are not NXP Mifare Ultralight and have ~160 bytes of memory.

In conclusion, by NFC most people mean, depending on context, a tag type or message format from the NFC ecosystem, or the NFC chip in their phones, even when they are using it with any old ISO 14443 tag4, which, closing the loop here, is what most people mean when they are referencing RFID.


  1. I got that example from Dr. Melanie Rieback, who does so in all her talks. 

  2. This is sometimes referred to as ‘1‑bit identification’, and extremely often seen in the context of electronic article surveillance

  3. The memory map table in the NFC tag type definition is an almost verbatim copy of that in the Ultralight data sheet, however, you will not find the words “mifare” nor “ultralight” anywhere in the tag type definition document. 

  4. The single most widespread ISO 14443 transponder type is Mifare Classic, which is not an NFC Forum tag type, but, confusingly, works with most NFC implementations in mobile phones as if it was.